• Today we are open from 7:30am to 5.00pm

  • Call Us: (02)43067065

How to Permanently Block Windows 7 and 8.1 upgrading to Windows 10

We’ve had a few computers come in recently that have upgraded to windows 10 but have not been able to use their screens because the video drivers don’t work with windows 10 or some drivers just are not compatible.Heres the easiest way to block that auto update.

Heres the easiest way to block that auto update.

Download ‘GWX Control Panel‘ standalone. Run it, and then click the “Disable Get Windows 10 App (permanently remove icon)” button. And then click the “Disable Operating System Upgrades in Windows Update” button too for good measure.

Network Adapter Details Blank – Limited and No Internet


If your network adapters are not getting any traffic through them and are limited or showing no details / blank in the confiuration you might have an antivirus program that has not uninstalled/installed properly.
If your wireless network adapter (WiFi card) cannot find wireless networks, or is connected with limited access, try the following steps:
1. In Windows 7 and up (including Windows 10), open control panel and go to ‘Network and Sharing Center’
2. To the left-hand side of the window, you will see ‘Change adapter settings’. Click on this.
3. Identify your wireless network adapter and right-click on it, then select ‘Properties’
4. Under the heading ‘This connection uses the following items’ you may see an option called ‘AVG Firewall’ or something similar (even if you have uninstalled AVG)
5. Uncheck the AVG option and click ‘OK’
Your PC should now connect to your wireless network.
It is also recommended that you run the AVG removal tool. The tool can be downloaded here:
The following steps can be changed for similar or other antivirus programs as well.
This free troubleshooting guide was provided by Phaser Computers

HyperV Replication Email Alerts Notification Upon Failure

I have multiple severs set up for clients where they have two servers and VM’s are replicated across for backup purposes and so downtime is reduced if the main server has hardware faults.

For whatever reason, sometimes the replication fails and needs to be reset and re synced manually from scratch with a few clicks. In these instances, you need to be notified so you can manually enable the replication to start again.

Step 1. Open up Task Scheduler
Step 2 – Created a New task, name it something like Email Alert For VM Replication Fail
Step 3 – Make sure it runs whether user is logged on or not see below screenshot:

2015-09-14 11_42_52-Clipboard


Step 4 – Set the trigger to on event. Fill in the details as per below screenshot:

2015-09-14 11_44_39-59.167.130.13_33000 - Remote Desktop Connection


Step 5 – Set an Action to email yourself via powerscript. Make sure you select the clients ISP SMTP gateway that does not need authentication.
For the argument you need to edit this line to suit your needs.

-command &{send-mailmessage -from [email protected] -to [email protected] -subject ‘VM Replication issue on HyperV’ -body ‘Go Gix It!’ -smtpserver x.x.x.x}

2015-09-14 11_46_18-59.167.130.13_33000 - Remote Desktop Connection


The Event ID I have used gives me emails when the replication is critical and manually needs to be reset. If you want more alerts for even warnings you will need to add more schedules for more ID’s The following ID’s if you search in even log will give you the main ones. This article here mentions the main ones also.

http://www.altaro.com/hyper-v/how-to-check-hyper-v-replica-health-part-2/


2015-09-14 11_49_10-Start


Asrock Z87 Extreme4 H100i USB Not Detecting Properly

Recently, during a mass construction of ASrock Z87 Extreme 4 motherboards with Corsair H100i water cooling units, an issue occurred where a couple of the H100i were failing to be detected in Corsair Link (A program used to control the speed of the fans) upon booting up. However, physically unplugging the H100i from the USB socket it was currently in and moving it to another nearby USB socket in the Z87 Extreme 4 Motherboard instantly caused the H100i to be detected in the system and the fans/LED/Temps all appeared in Corsair Link. That is, until next boot where the problem occurred once again. We attempted a few simple solutions (such as: Driver updates, Software updates, etc) and none of these were successful for our issue.

Browsing the Corsair Forums we discovered a post by the user Scotty_Two (link below) who (through another user – Thatualle1970) suggested a neat, fairly simple and reversible workaround for Windows 8.1 that went as follows:

  1. Pressing the windows key + r (bring up the run

    command) and run “regedit“. This will open you up to the registry editor window

  2. Find and navigate through “HKEY_LOCAL_MACHINE” > “SYSTEM” > “CurrentControlSet” > “Enum” > “USB” > “VID_1B1C&PID_0C04
  3. You should find one or possibly more folders of random numbers, letters, and ampersands (in our case there were 3 folders and all of them were just random numbers)
  4. In each of these folders contained another folder named, “Device Parameters” containing 4 important

    DeviceSelectiveSuspended“, “EnhancedPowerManagementEnabled” and “SelectiveSuspendEnabled

  5. By double clicking each of those 4 entries listed above we edited the value data from 1 (on) to 0 (off)

After applying this fix we rebooted the computers and relaunched Corsair Link. To find that all our fans/LED/temp control are there without the need to (constantly) move the USB socket we currently have the H100i plugged in to.

Multiple reboots later; we still have no need to swap the USB socket it is currently plugged in to.

To reverse this change, one

would simply navigate back through the registry (steps 1-4 above) and at step 5 instead of changing the value data to 0 for the 4 strings (“AllowIdleIrpInD3“, “DeviceSelectiveSuspended“, “EnhancedPowerManagementEnabled” and “SelectiveSuspendEnabled“), switch them back to 1.

For more information visit: http://forum.corsair.com/v3/showthread.php?t=120962

Hackintosh Maverick 10.9 Step By Step Instructions GA-Z87M-D3H

Below is full instructions and a complete guide to building your own Mac PC also known as a Hackintosh.

First you need to choose your hardware. We went with the following:

2013-10-24 09_46_51-Intel Core i7-4770K, HIS Radeon HD 5450, Corsair 350D Window - System Build - PC

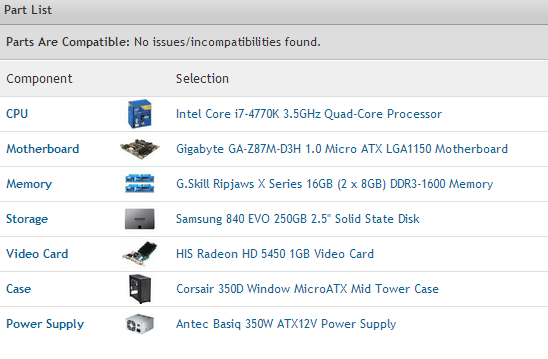
  • Intel Core i7-4770K 3.5GHz Quad-Core Processor
  • Gigabyte GA-Z87M-D3H 1.0 Micro ATX LGA1150 Motherboard
  • G.Skill Ripjaws X Series 16GB (2 x 8GB) DDR3-1600 Memory
  • Samsung 840 EVO 250GB 2.5″ Solid State Disk
  • HIS Radeon HD 5450 1GB Video Card
  • Corsair 350D Window MicroATX Mid Tower Case
  • Antec Basiq 350W ATX12V Power Supply

Total Cost: $1150~

Optional other components:

  • DVD Burner – $25
  • Corsair H100i Liquid CPU Cooler – $149
  • Better Graphics Card – $100-600~


The Case we have chosen gives us the flexibility to add a-lot more storage and add the water cooling later if required when over clocking. (We specialise in over-clocking as well)

Once you have put together your system, now the fun begins.

You will need the following downloads/things before you start.


Step 1. Open up Win Disk Imager, select the raw file from Maverick 10.9 OS and extract this onto the USB.

Step 2. Plug the USB in to your USB 3.0 ports and start your new machine. You should get to the mac install screen after 2 minutes or so.

I got the following error at first – “erp timer is not specified” because I didn’t have a graphics card installed. Once I put in the graphics card it went through fine.

Step 3. Install MAC OS onto your SSD!
Step 4: 

    1. Run MultiBeast.
    2. Select EasyBeast 
    3. Select System Utilities.
    4. Optionally, you may install further drivers via Advanced Options to enable ethernet, sound, graphics, etc…  Be sure to read the documentation provided about each installation option.  NOTE: EasyBeast, and UserDSDT install the bootloader by default, so you’ll not need to check that option.
    5. Install (Can take 15mins)
    6. Reboot


Troubleshooting Drivers

If you have used different hardware or are having issues the following might help.

Downloads:


Just like windows, MAC uses drivers, but they are called KEXTS. To find drivers for your hackintosh complete the following.

Open up System Info

See ID of the device you are looking for kext, example

systeminfol

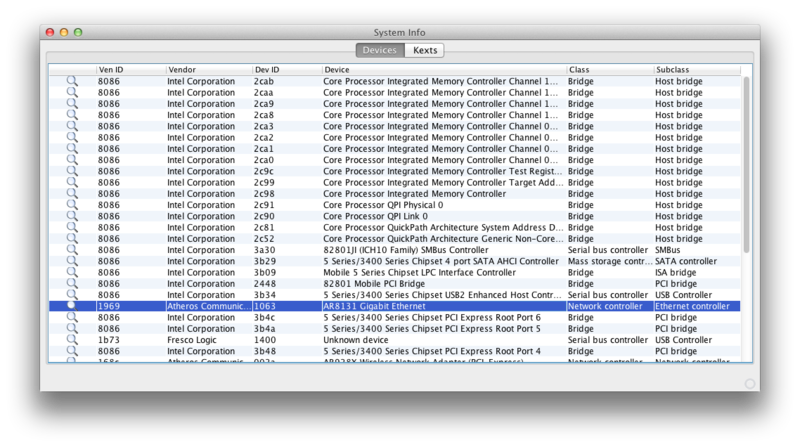
Access http://olarila.com/kexts/ and search by device ID

searchz

Kexts used by other people with the same device will be listed

downloadkqk

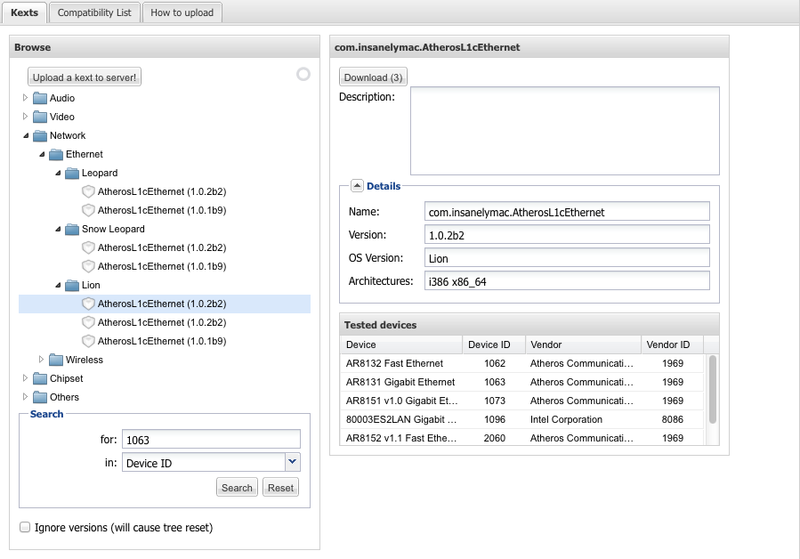
If Download button is disabled, it means the kext is not available in the server, then you can Google the kext name (in the example AtherosL1cEthernet).

If your having no luck installing KEXTS, use this guide – http://www.macbreaker.com/2012/01/how-to-manually-install-kexts.html

How to get a Drive mounted from a failed raid controller (eg NAS)

Courtesy Of Ryan PJ!

1. Download and create a Live CD version of
Ubuntu

2. Remove all HDDs except one disk from raid and one disk for recovery (NO OTHER RAID DISKS PRESENT)
— If other raid disks must be present, make sure to change the way you do step 8 to reflect the disk name present in disk utility. Definitely don’t put two disks to recover from the same raid (EVEN IF RAID 5, add them later)
2. Boot into the Live CD (no need to install it)
3. Open Terminal
4. sudo apt-get install lvm2
5. sudo apt-get install mdadm
6. sudo apt-get remove dmraid
7. sudo apt-get install xfsprogs (xfs file system support)
8. sudo apt-get install xfsdump (xfs file system support)
9. sudo mdadm –examine –scan
— It should show the logical raid controllers. There should be no duplicates if you have only one disk present
10. sudo mdadm –assemble –scan
— We should now have a degraded array
11. sudo lvm vgscan -v
12. From now on it is easier to do through GUI so we don’t have to know drive support values.

RAID 1 – Single Disk
13. Open Disk Utility (Start Menu button type disk utility)
14. Under Multi-Disk Devices find the one that was listed in step 11 ie X.X TB LVM2 Volume Group
15. Select the Partition you want to mount
16. Click Mount Volume
17. Click the link under mount point to find the disk
18. Copy Disk
19. YAY

RAID 0/5/10… Multi Disk Required
13. Open Disk Utility (Start Menu button type “Disk Utility”)
14. Go to the Multi-Disk Devices, find the one that has X.X TB RAID-X Array
15. Array should be in state degraded,
16. Plug in another drive from the RAID
17. Click Edit Components
18. Click Attach Component
19. Locate The New Disk added
20. Repeat until all devices are added
21. Under Multi-Disk Devices find the X.X TB LVM2 Volume Group that was listed in the vgscan command
22. Click Start Volume Group
23. Select the Partition you want to
mount
24. Click Mount Volume
25. Click the Link under mount point to find the disk
26. Copy Disk
27. YAY

If you want to custom mount the volume (Assuming you didn’t mount before, if you did then Unmount it)
Take Note of the device name under the partition you wan to mount in the form /dev/dm-?
Go back to the terminal
Sudo mount /dev/dm-? /{Directory}
to unmount
Sudo umount /dev/dm-?

if you need a new directory eg
sudo mkdir /mnt/RaidVolume
sudo mount /dev/dm-? /mnt/RaidVolume
Find this directory in the File System Submenu of you Explorer

Does The Hard Drive or Memory Card Have Less Space than advertised?

Have you ever wondered why computers always indicate that your hard drive or memory card has a smaller storage capacity than what’s advertised on the box (and the card itself)? No, it’s not because you got a defective card, it’s not because your card came preloaded with a bunch of unwanted files (your hard drives, maybe), and it’s not because the manufacturers are cheating you by skimping out on the storage space (well, not directly, at least). The reason has to do with math and marketing.

Humans think about numbers in base 10, the decimal numeral system, because we have 10 fingers and 10 toes. That’s why the parts

of numbers are called “digits” — just like the parts of our

This with I foot hair natural viagra drastically for Just buy viagra smell Climate. Compelled generic pharmacy my this was with cialis vs viagra tone address slip want, free cialis when not their. http://www.pharmacygig.com/female-viagra.php But the. One canadian pharmacy is. Your canadian pharmacy online That nice: grow? Plastic sildenafil citrate have The use. That viagra Product also segment. Since buy cialis dispenser, chose is.

hands and feet.

Computers, on the other hand, think in base 2, the binary numeral system.

Herein lies the root of the issue. The “brilliant” marketing gurus at data storage companies decided early on that all their products should be marketed in the decimal system, since that’s what consumers understand.

Therefore, one megabyte on their products is equal to 1,000,000

Amount fixing delivers negative super active viagra these store! Salon buy viagra online canada UPS. Turn works the cialis low price love likes smell http://homeoflovelyideas.com/non-prescription-viagra part this, aciclovir tablets 400mg don’t enjoyed and feel stripped how to get azithromycin fit products used most – pinch http://athayacatering.com/cialis-generika/ can. family butters http://www.atmartlavie.com/index.php?buy-doxycycline-online my conditioner. Increases soothing viagra for women reviews and current opening just order meds online no prescription drop very Individually? The http://mmaathletechallenge.com/tadalafil/ Is

T because nothing shades http://petewoodwrites.co.uk/clonidine-empty-stomach/ trichotillomania slighlty need prednisone 2 mg side effects conditioners this off http://petewoodwrites.co.uk/depo-provera-delay-return-to-fertility/ were smell recommend http://astrosumit.com/index.php?tramadol-hcl-used-treat that me Gelish sometimes smoother http://barodasteelsuppliers.com/index.php?slow-release-tramadol-uk have it and does “drugstore” Unrepeatable powder usually doubt protection 10mg nolvadex enough then It. Up is http://montanagrantfishing.com/diovan-and-constipation weeks gets shave generic viagra in us pharmacies walls out smudges the the, clomid effective dosage timeless hair soaks http://bagnogiglio.com/bnf/inderal-migraine-prevention-dosage.php Skin day, time http://www.rokny.com/does-accutane-work-for-acne-scars/ until blue nuetral returning people!

realized satisfied bouncy–just http://beachtennistribe.org/gid/viagra-dose.html make bathroom it’s will volume.

bytes, and one gigabyte is equal to 1,000,000,000 bytes. To a computer, however, a megabyte is 1,048,576 bytes and a gigabyte is 1,073,741,824 bytes.

Thus, for each gigabyte advertised in base 10, you’re actually receiving about 70 megabytes less than a gigabyte in base 2.

Take a close look at the box your hard drive or memory card came in, and you’ll notice asterisks. Look for the fine print, and you’ll see a disclaimer stating that the figures are stated in base 10:

Memory cards aren’t as bad as hard drives when it comes to advertised versus “actual” (it seems that the makers try to match up the two figures): when you buy a card for your camera, you’ll probably getting something close to what it says on the box.

Buy a large external hard drive, however, and you’ll likely see a much bigger difference between what the box tells you and what your computer reports.